The Invoices section allows you to create, send, and monitor invoices for your clients — all in one place.
From this module, you can:
- Generate professional invoices
- Track payment status
- Manage drafts and sent invoices
- Export or resend documents when needed
📂 Invoice Management Dashboard
Go to Sidebar → Invoices
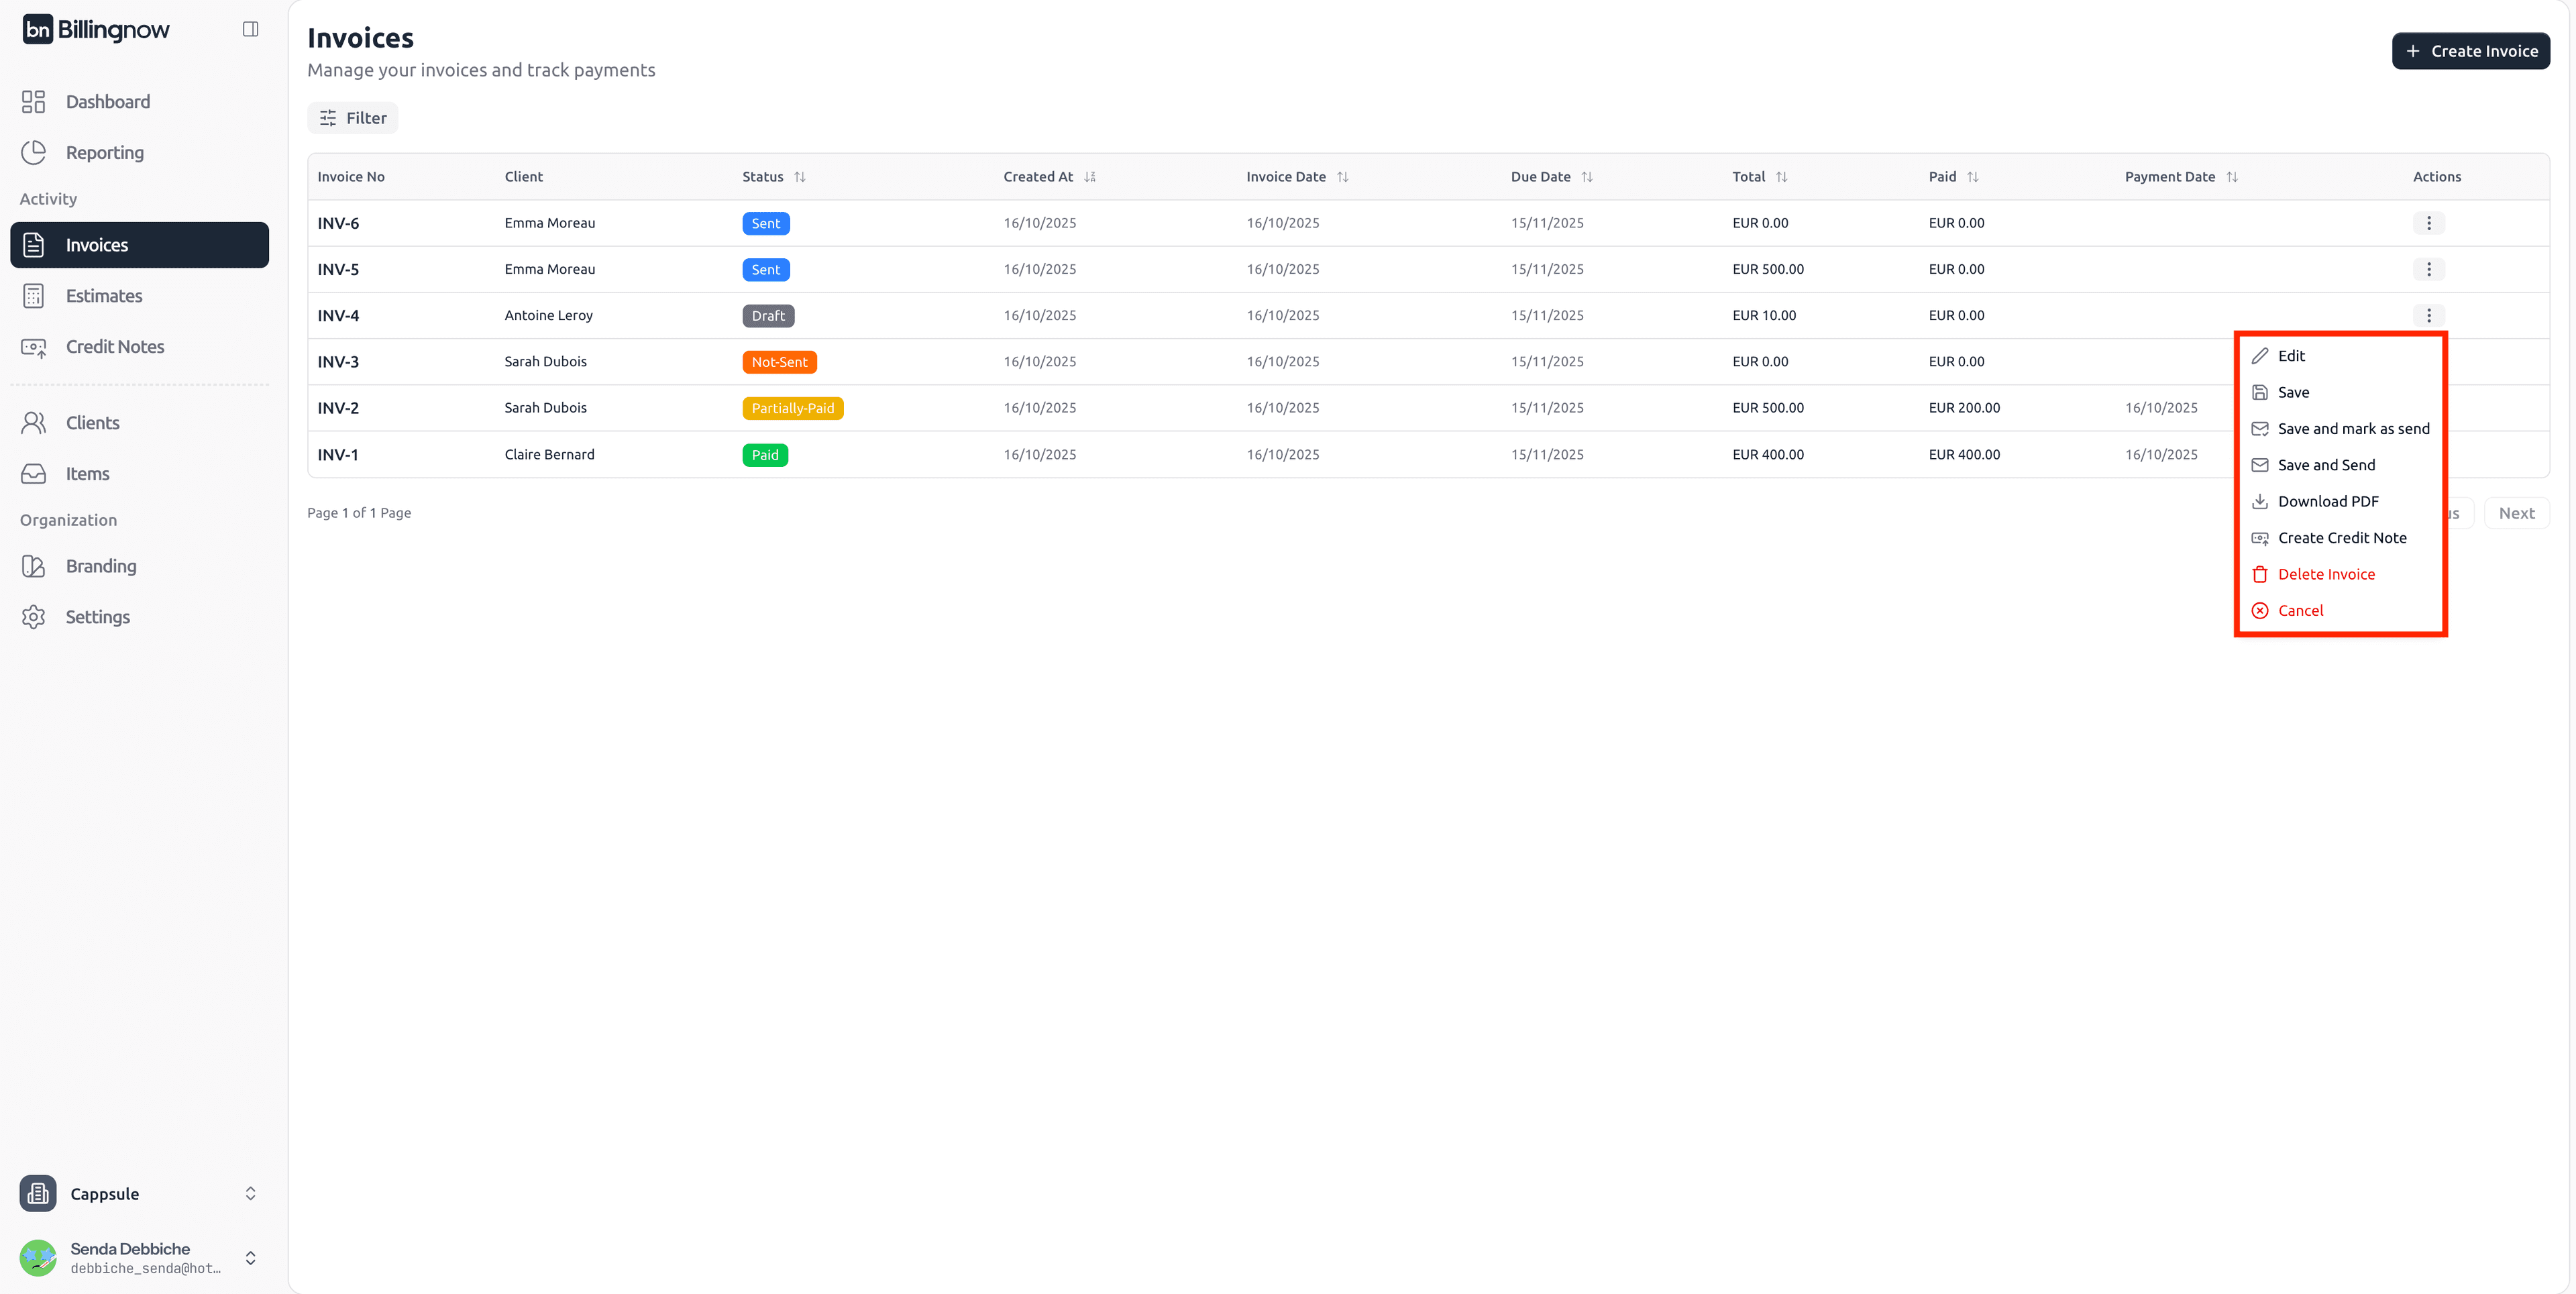
From the invoice dashboard, you can view all invoices in a structured table.
| Column | Description |
|---|---|
| Invoice No | Unique invoice identifier (e.g. INV-001). |
| Client | The customer linked to the invoice. |
| Invoice Date / Due Date | Dates for creation and payment. |
| Total | Total amount before and after taxes. |
| Status | Current state (Draft, Sent, Paid, Overdue). |
| Paid / Payment Date | Displays the payment amount and date. |
| Actions | Edit, duplicate, or delete options. |
⚪ Draft – Not yet finalized.
🟠 Not Sent – Finalized but not yet sent to client.
🔵 Sent – Sent to the client.
🟡 Partially Paid – Partial payment received.
🟢 Paid – Fully paid invoice.
🟣 Overdue – Payment delayed past due date.
🔴 Cancelled – Invoice has been cancelled.
➕ Creating a New Invoice
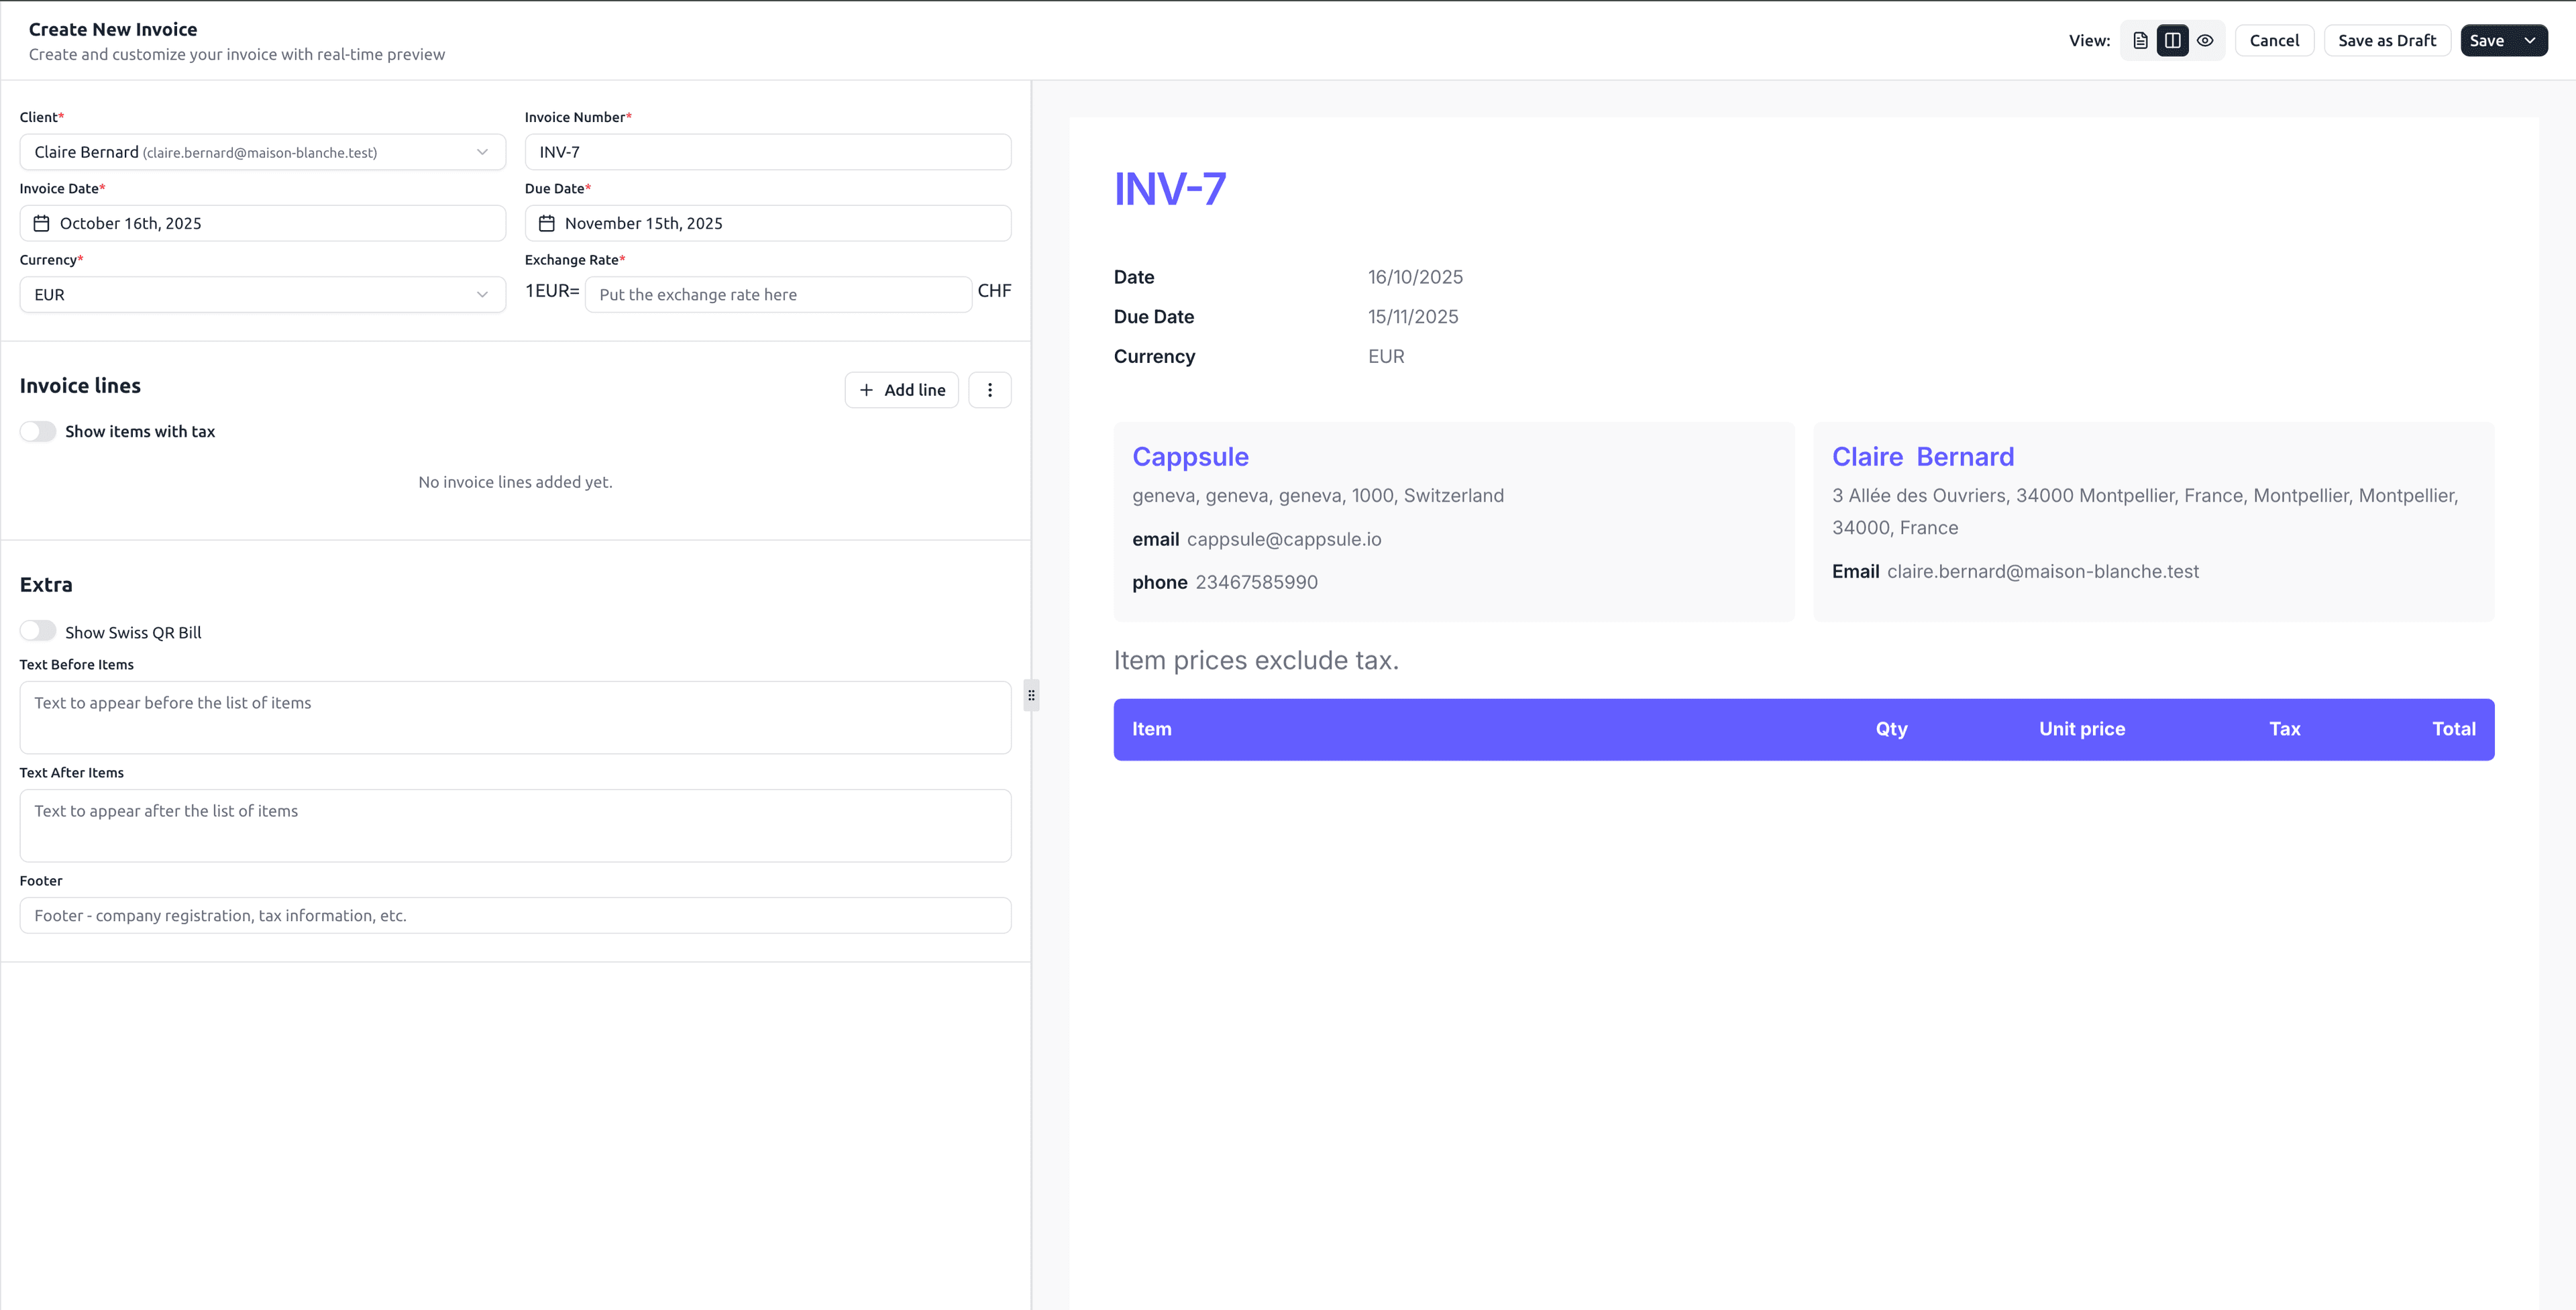
To create a new invoice, click the “Create Invoice” button in the top-right corner.
🧾 Step 1: Select a Client
Use the Select Client dropdown to find an existing client. Or type a new client name and click Add New to create one on the spot.

🗓️ Step 2: Define Invoice Details
Fill in the main invoice information:
| Field | Description |
|---|---|
| Invoice Number | Auto-generated or manually assigned. |
| Invoice Date | Date of issue. |
| Due Date | Deadline for payment. |
| Currency | Choose invoice currency (e.g., USD, EUR, TND, DJF). |
Use consistent currency for all invoices related to the same client for clarity and accounting accuracy.

🧮 Step 3: Add Invoice Lines
Click Add Line to include products or services.
Each line includes:
- Item name or description
- Quantity
- Unit price
- Tax (if applicable)
For shipping costs: Add shipping as a separate line item with description “Shipping” or “Delivery”, quantity 1, and the shipping amount as unit price.
Use the toggle “Show items with tax” to include tax details in each line item.
Show items with tax: Determines whether item prices are entered and displayed as gross (with tax) or net (without tax). Totals are shown accordingly, and slight differences may appear due to rounding when converting between net and gross prices.
📝 Step 4: Customize Additional Texts
Under the Extra section, personalize your invoice:
| Field | Description |
|---|---|
| Text Before Items | Add notes that appear before the item list. |
| Text After Items | Display payment instructions or thank-you notes. |
| Footer | Add company registration, tax info, or terms. |
Example:
🧾 “Thank you for your business! Payment is due within 30 days.”
🏦 “Please transfer to IBAN: TN59 0100 1234 5678 9012 3456.”
💾 Step 5: Save or Send
Once your invoice is ready, you can:
| Action | Result |
|---|---|
| Save as Draft | Keeps the invoice editable and hidden from the client. |
| Save (Not Sent) | Finalizes and moves invoice to “Sent” status. |
| Send | Sends the invoice via BillingNow’s email system. |
| Mark as Sent | Marks invoice as sent (for manual sending via your own email). |
| Edit | Modify the invoice details. |
| Download PDF | Downloads the invoice as PDF for manual distribution. |
| Create Credit Note | Creates a credit note linked to this invoice. |
| Delete Invoice | Permanently removes the invoice from your system. |
| Cancel | Discards current changes without saving. |

Always Save as Draft first to review the layout preview on the right. When satisfied, click Save to send or publish.
💌 Sending Invoices via Email
You can share invoices with your clients in two ways:
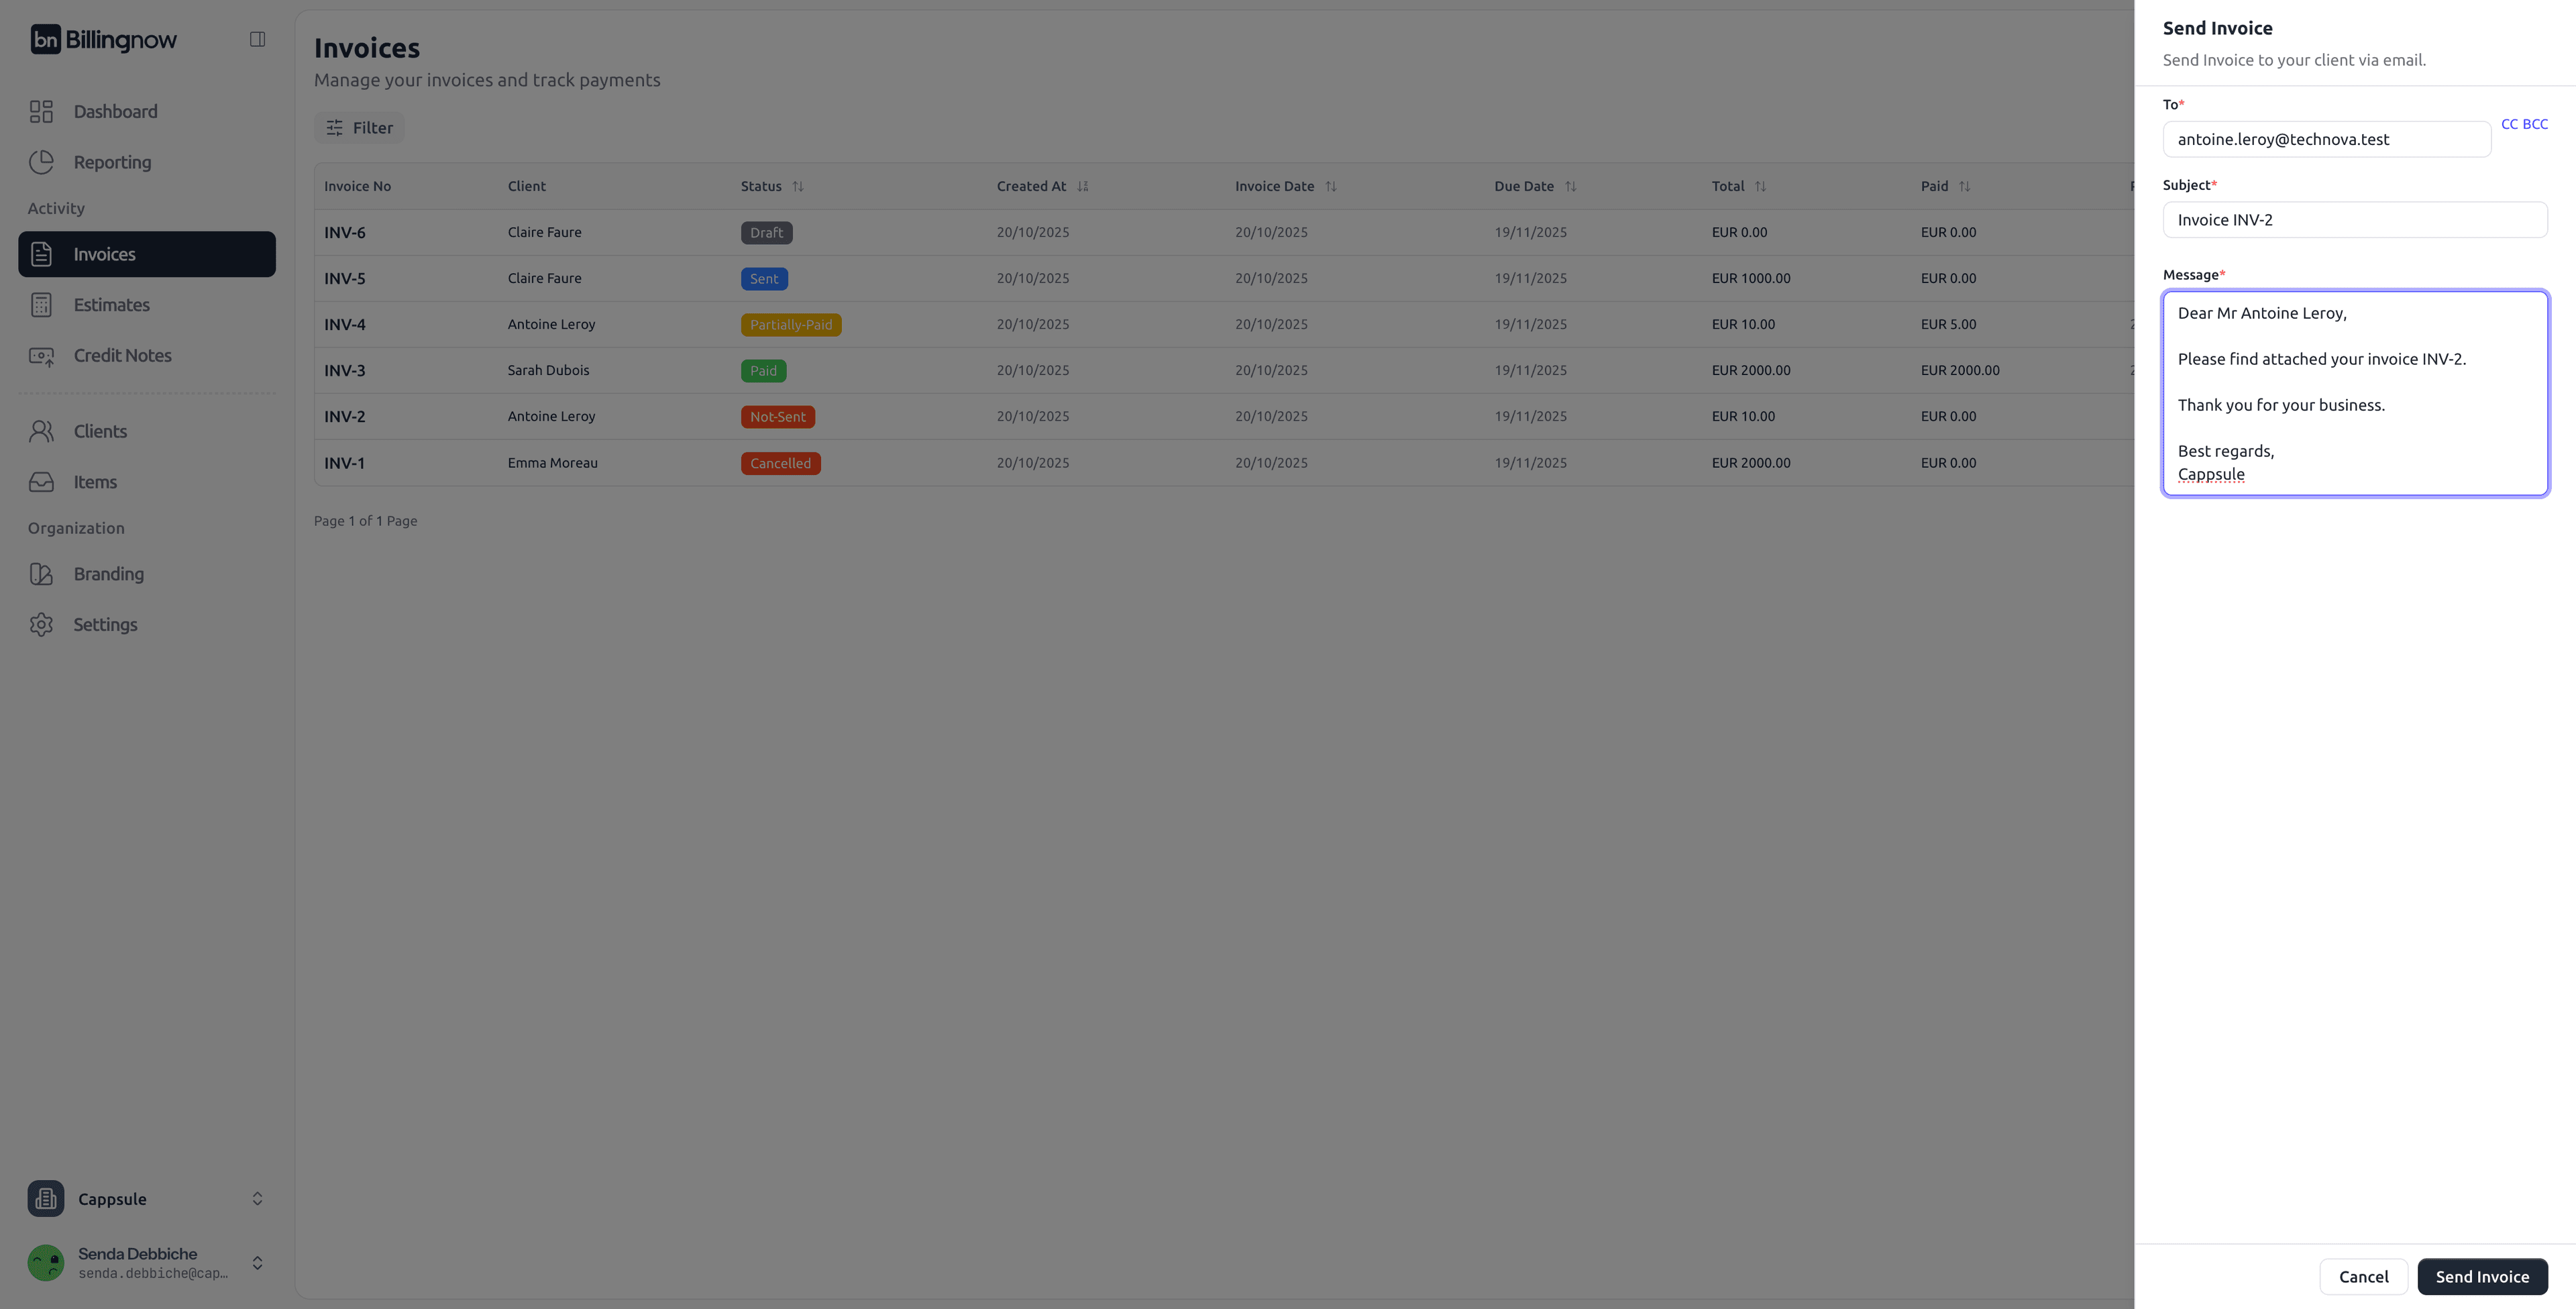
1️⃣ Send Directly from BillingNow
Use the “Send” button to deliver the invoice automatically from the system. BillingNow will send a professional email to the client, including:
- The invoice PDF as an attachment
- The invoice summary (number, total, and due date)
- A short personalized message
Example of email preview:
Subject: Invoice INV-2
Body:
Dear Mr Antoine Leroy,,

Please find attached your invoice INV-2.

Thank you for your business.

Best regards,
Cappsule
Options:
- You can customize the subject and message body before sending.
- Once sent, the invoice status changes to Sent, and a timestamp is recorded in the dashboard.
- The client’s email address is automatically taken from their profile.
Make sure your client’s contact email is correct in the Client Details section to ensure successful delivery.
2️⃣ Send Manually from Your Personal Email
If you prefer to use your own mailbox (e.g., Outlook, Gmail):
- Click Download PDF on the invoice.
- Attach the downloaded file to your personal email.
- Write your own message and send it manually.
- After sending manually, return to the invoice and click Mark as Sent to update its status in BillingNow.
Email Sending Status
Once an email is sent from BillingNow:
- The status icon changes from 🟠 Not Sent to 🔵 Sent.
- The Sent Date column displays the exact timestamp.
- You can Resend the invoice anytime from the Actions menu.
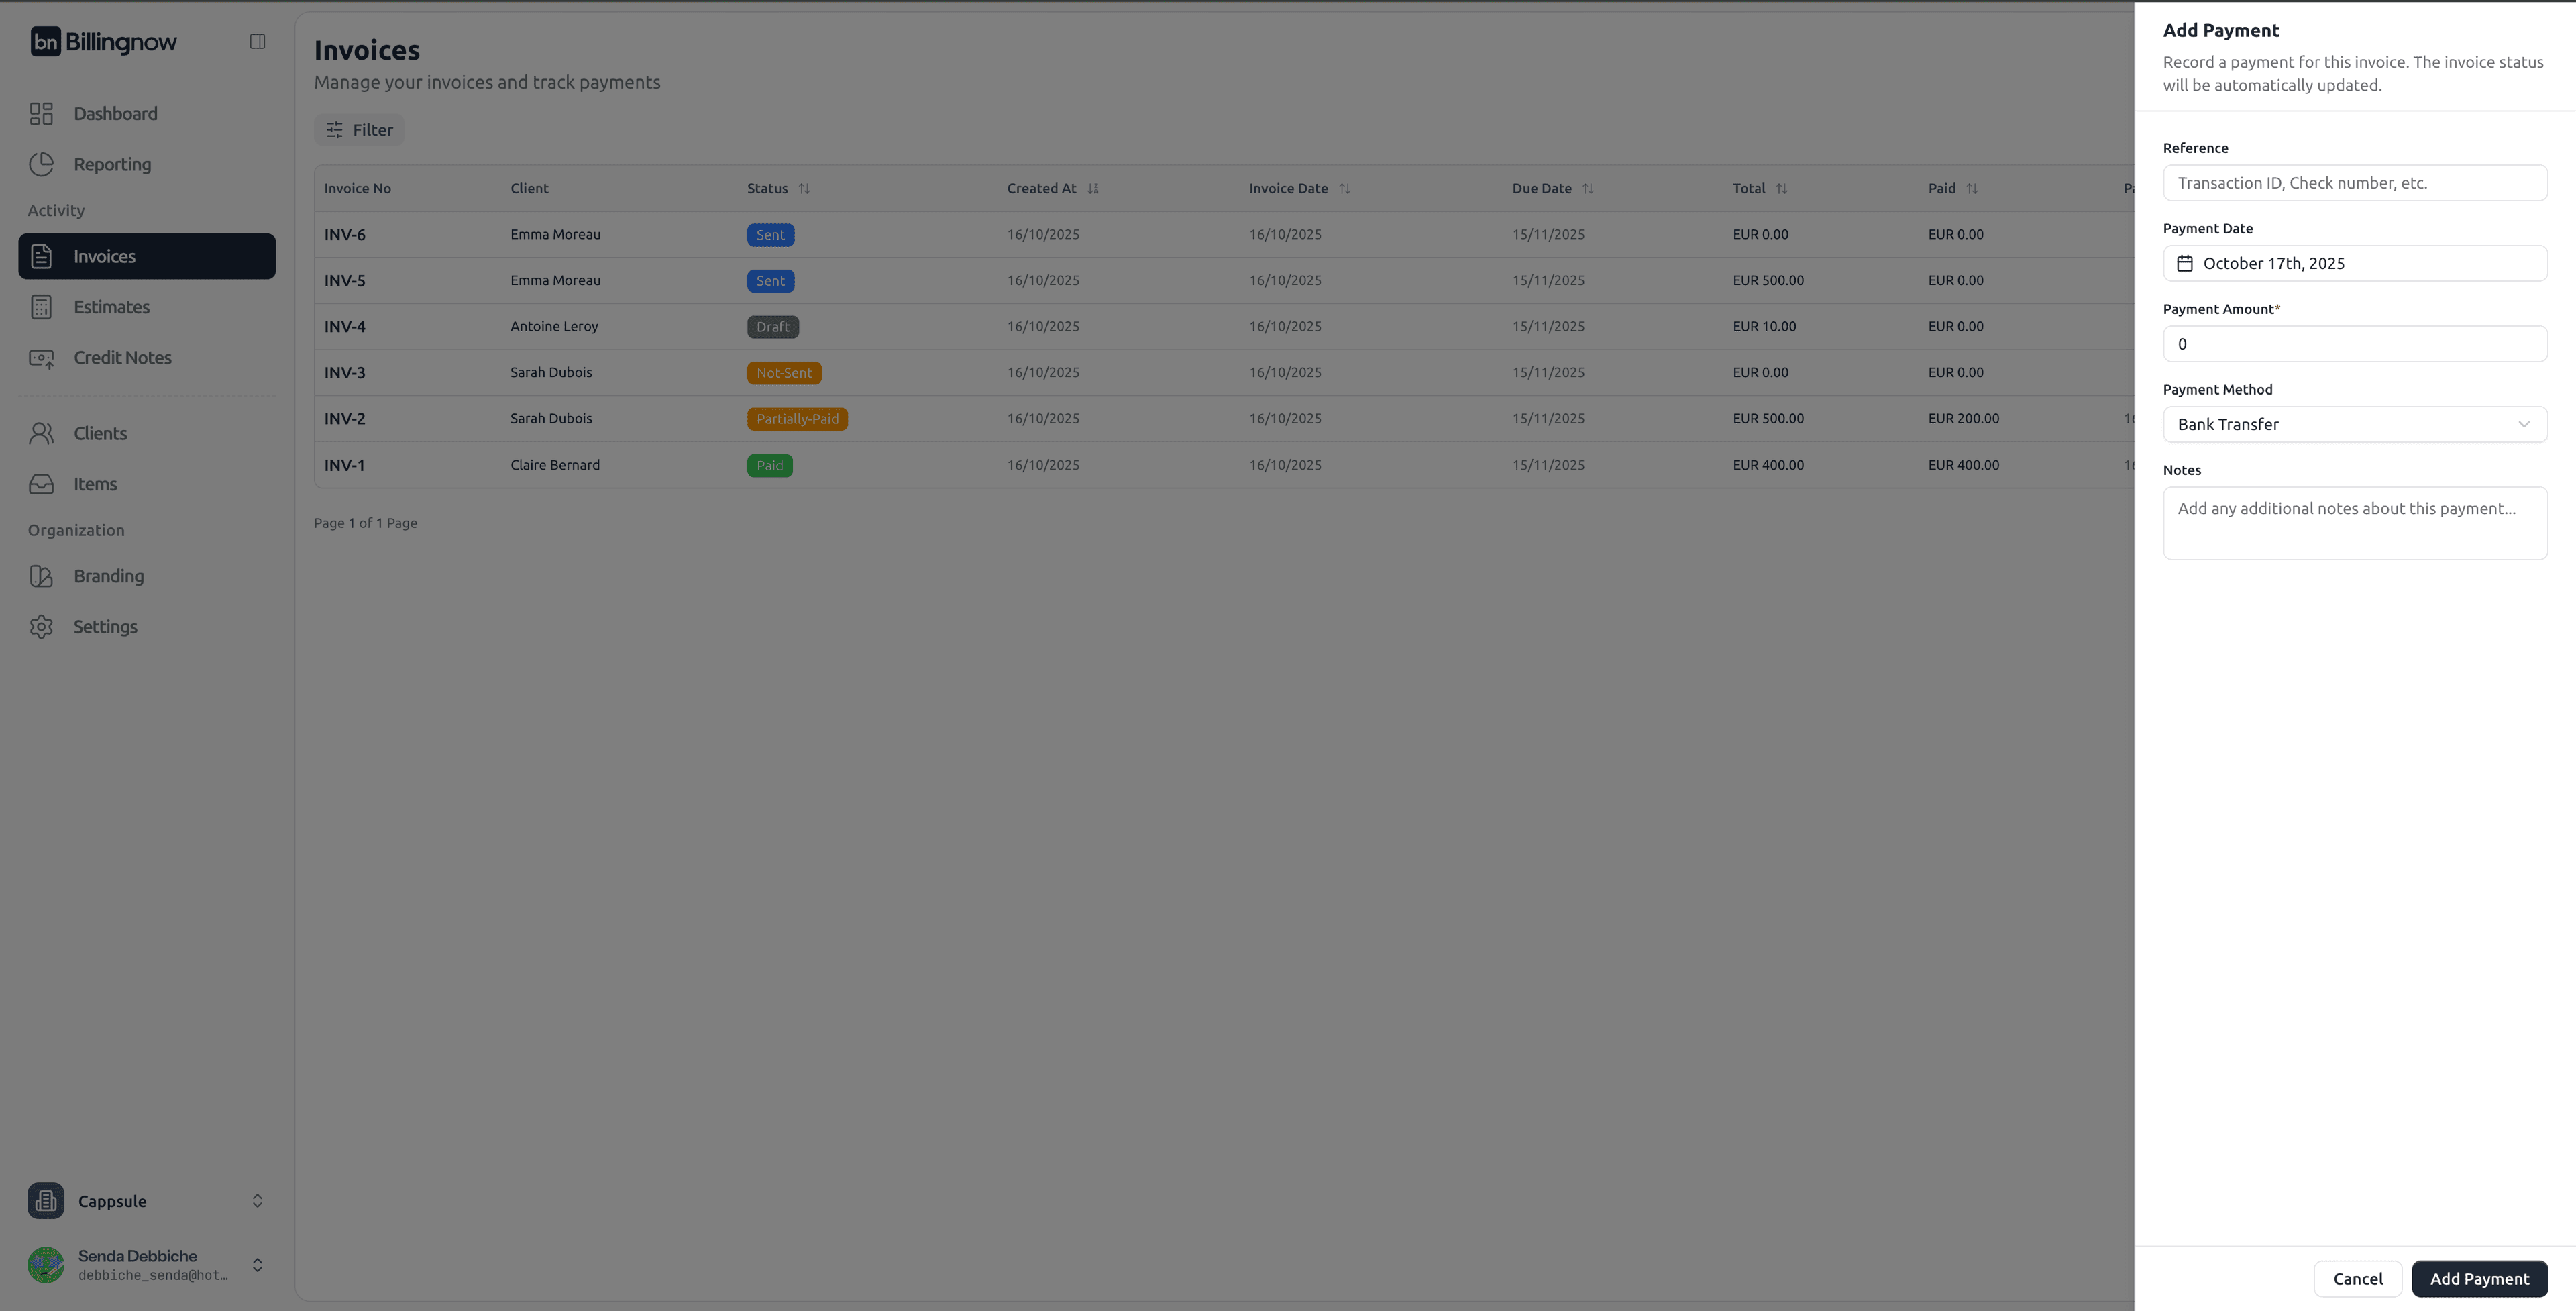
💰 Step 6: Add Payment
Once an invoice has been sent, you can record payments received:
Payments can only be added to invoices with “Sent” status. Draft and “Not Sent” invoices cannot receive payments until they are sent.

To add a payment:
- Select the invoice from your invoice list and click on actions
- Click “Add Payment” button (available only for sent invoices)
- Enter payment details:
- Reference
- Payment date
- Payment amount
- Payment method (Bank Transfer, Credit/Debit Card, Cash, Check, PayPal, Other)
- Save the payment
The invoice status will automatically update based on the payment:
- Partially Paid - If payment is less than the total amount
- Paid - If payment equals or exceeds the total amount
💡 Best Practices
✔ Always double-check due dates and currency before sending.
✔ Add personalized messages in your footer to build client trust.
✔ Keep consistent numbering (e.g. INV-001, INV-002…) for bookkeeping.
✔ Use drafts for internal reviews before sending final invoices.
✔ Add shipping costs as separate line items for clear billing transparency.